Μετάβαση στο περιεχόμενο


Φωτογραφία
- - - - -

Πως να δημιουργήσετε το δικό σας Fusion Drive


  • Παρακαλούμε συνδεθείτε για να απαντήσετε
90 μηνύματα σε αυτό το θέμα

#1   mikexs

mikexs

    iPH Master

  • 5.698 μηνύματα
  • Twitter:@mikexst
  • Φύλο: Άντρας
  • Κινητό: iPhone 6
  • Tablet:iPad 3

Δημοσίευση 01/12/2012 - 11:54

Αν θεωρείτε ότι η τιμή του Fusion Drive για τα 2012 Mac Mini και iMac είναι υψηλή, δημιουργήστε τον μόνοι σας!

Τι απαιτείται:

1. Ένα Mac Mini ή iMac του 2012.
2. OSX Version 10.8.2 και πάνω.
3. Ένας μηχανικός δίσκος (ο προεγκατεστημένος).
4. Ένας δίσκος SSD.

Παράδειγμα setup:

Mac Mini 2012 με τον default σκληρό δίσκο και SSD ταυτόχρονα μέσα στο μηχάνημα μέσω του dual hard drive kit του iFixit.

Τα τελευταία iMac και Mini, στην έκδοση 10.8.2 έχουν μια έκδοση του disk utility η οποία επιτρέπει τη δημιουργία Fusion Drives.


*** Υπάρχει περίπτωση η Apple, σε επόμενο OSX update να απενεργοποιήσει αυτή τη δυνατότητα, αλλά ποτέ δεν ξέρεις ***


Παραθέτω αυτούσιες τις οδηγίες από την OWC.

(Για τους τολμηρούς... το κείμενο μεταφρασμένο στα Ελληνικά μέσω Google Translate, εδώ)


Setting up a Fusion Drive

Items Needed:

- A 2012 Mac mini – this is an absolute requirement as these are the only machines that currently have a version of Disk Utility that can create a Fusion volume.
- A hard drive and an SSD installed/to install internally – Fusion is designed to work on internal drives only.
- An external drive to clone to – creating a Fusion volume will erase both the SSD and the hard drive, so if you have information on the hard drive you want to keep, you’ll need to have a copy of that data elsewhere.

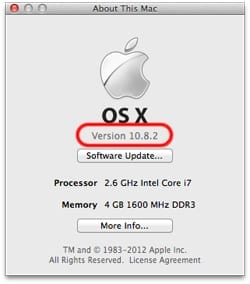
Step 1 – Make sure you’re up-to-date.
Make sure the OS on the mini’s drive is updated to 10.8.2 or later. This is absolutely necessary, as the proper version of Disk Utility for doing this is on 10.8.2 or later on the mini and you want the OS versions to match.

Αναρτημένη εικόνα

Step 2 – Have a copy of your computer’s data.
This process will erase both the installed SSD and hard drive, so if you have data on one or both of these drives, you’ll want to have a copy that’s not on either of the two drives that are going to be part of the Fusion array. If you are installing both a new SSD and a new platter-based drive into, you can put your original drive in an external enclosure, and your data will be there, out of the way. If you’re using the same drive that you already have installed, you will need to copy that drive’s contents to an external one.

Step 3 – Install the new drive(s) in the computer you’re upgrading.
See our video page for our step-by-step instructions on installing one or both drives into your mini.

Step 4 – Boot to the external drive.
We need to boot to the version of 10.8.2 that came with the Mac mini, but since you can’t erase the drive if you’re booted to it, simply boot to your clone by holding down the Option key at startup and selecting the external drive you cloned to (it’ll have the orange icon). Then, log in to the desktop like you normally would.

Step 5 – Open Terminal.
If you installed at least one brand new drive, you will likely get a message about a disk being unreadable. That’s okay; just click “Ignore.” We’ll be initializing it over the next couple of steps.
You can then open Terminal. You can find it in Applications/Utilities/Terminal.app

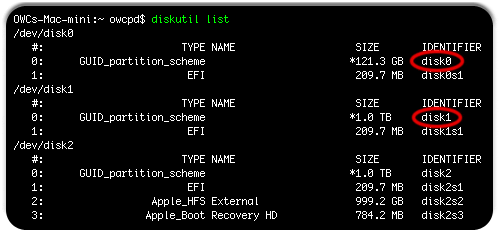
Step 6 – Find Your Disk IDs.
In Terminal, type: diskutil list

This will have the command-line version of Disk Utility (diskutil) that lists all the disks attached to your computer. In the results, you will find the disk IDs of the HDD and SSD. Take note of these ID numbers. In most cases (2 drives internally and booted from the external), the IDs will be “disk0” and “disk1.” However, individual results may vary, depending on your setup, so you’ll want to make sure you have the right drives.


Αναρτημένη εικόνα


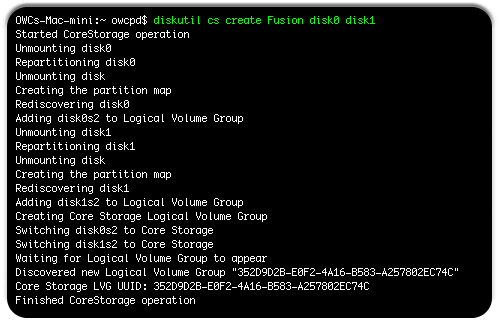
Step 7 – Create the Fusion drive array.
In Terminal, type: diskutil cs create drivename driveIDs

This is the command that actually tells your Mac to tie the drives together in a Fusion array.

Broken down, the step does this:

diskutil - the command-line version of Disk Utility.
cs - this invokes Core Storage, which is necessary for Fusion.
create - creates a Core Storage group.
drivename - this is the name of the drive and how you want it to appear in Disk Utility (not the Finder – that comes later). You can call it whatever you want; in our example, we named our Fusion array “Fusion.”
driveIDs - these are the drive IDs of the drives you want as part of your Fusion array, separated by a space. In our example, they are “disk0” and “disk1”, but it may be different in your setup.
Once you enter in this command, it’ll do its thing and set-up the drives into an array for Fusion.


Αναρτημένη εικόνα


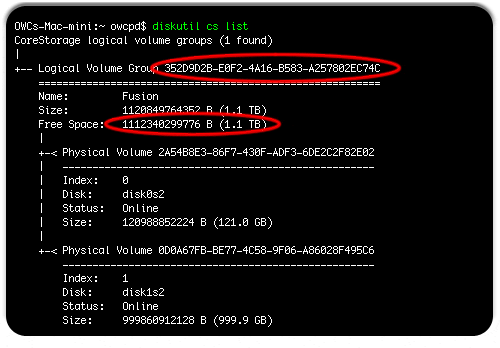
Step 8 – Get ID information for Fusion array.
In Terminal, type: diskutil cs list

This will give you a listing showing any Core Storage Logical Volume Groups (aka Fusion Drive). You will need to do two things here. First, copy the long alphanumeric string for the Logical Volume Group, then note the Free Space for it. You will need both of these for the next step.

Αναρτημένη εικόνα

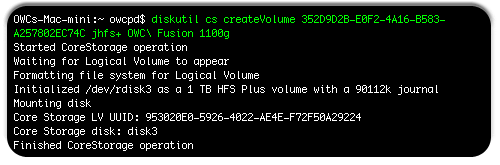
Step 9 – Format the Fusion drive so you can put files on it.
In Terminal, type: diskutil cs createVolume groupString jhfs+ volumeName size

This command creates a volume on the Fusion array where you can place your files. Again, since some important stuff is going on here, let’s break down the command.

diskutil - again, this is the command-line version of Disk Utility.
cs - invokes Core Storage functions, which are necessary for this arrangement.
createVolume - this is the command to create the actual storage area for the drive that is represented on your desktop by an icon.
groupstring - this is the long alphanumeric string you copied from the previous step. It identifies that the array you created as the one getting a volume placed on it.
jhfs+ – the format of the drive. This is Apple Extended Format (journaled), which is recommended for drives with an OS installed on it.
volumeName - the actual name of the volume, how it should appear underneath the icon. If there is a space in the name, you should either put the entire name in quotes (“Drive Name”) or put a backward slash before the space (Drive\ Name). In our example, we did the latter, naming our volume “OWC Fusion.”
size - this is the size of the volume. In our example, we had a 1.1TB drive. We used “1100g” to denote it as 1100GB (1.1TB in base 10). Alternatively, we could have also used 1.1T, or even 100% as a size.
Once you have this information entered, hit Return and let it do its thing; the Fusion Drive will then be available in the Finder.

Αναρτημένη εικόνα

Step 10 – Boot to your clone’s Recovery Partition.
Now that we have created the Fusion volume, we can now install the OS and bring over your data.

Boot to your clone’s Recovery Partition by holding down Command-R at start-up.

Step 11 – Install OS X
Once booted to the Recovery Partition, select the option to Reinstall OS X. Follow the prompts for installation, choosing your new Fusion Drive as the destination. You will need an Internet connection to do this; an Ethernet connection is preferable, though you will also be able to use an AirPort connection, albeit at slower speeds.

Step 12 – Migrate over your information.
As part of the setup for your new installation, you will be asked if you wish to import data from another disk; you will want to. Select your clone and Migration Assistant will bring over your data.

Step 13 – Enjoy your new installation.
Once migration has completed, shut down your computer and disconnect your clone. At this point, you will have OS X running on a Fusion drive on your computer. You can now use it like you would any other drive.

Things to consider before committing to a Fusion setup
As with any drive setup, there are pros and cons to a Fusion array. The pros, as mentioned at the beginning of the article are that it appears single volume and works automatically to keep the best speed. However, there are a couple of cons that you should also be aware of.

You will need a backup.
While a backup plan for your computer is something you should have anyway, this becomes even more important for Fusion Drive equipped Macs. The way Fusion is set up, if either the hard drive or the SSD fails, the data on both drives is lost. Having a reliable, frequent backup plan will be essential in protecting against data loss.

Performance may not be enough for high-end professional use.
Apple claims near-SSD performance for Fusion-equipped drives. For casual use (email, Web browsing, basic iPhoto use, etc.), this is largely true. From testing both in-house and by Lloyd Chambers of Mac Performance Guide, a Fusion Drive will first fill the faster SSD portion, then start filling the slower hard drive. Once writing is complete, data will be moved from the SSD to the hard drive until there is 4GB free on the SSD again.

The trouble comes when you start working with larger files, such as with pro audio, video and large-scale photo work. Often, these files far surpass the 4GB size, so you will see fast SSD transfer speeds followed by a precipitous drop in speed when it transfers over to the hard drive. For a full rundown of testing, check out Lloyd’s writeup at Mac Performance Guide.

For those that a Fusion Drive just isn’t going to be practical, you may be better served using a Hard Drive/SSD 2-drive setup with a relocated home folder. You reduce the risk of losing all your data at once, while still retaining a large portion of the speed/storage benefits of Fusion, but with more flexibility.

[via OWC blog]

Τελευταία επεξεργασία από: mikexs, 01/12/2012 - 11:57


Ad

Ad

Team
iPhoneHellas
3,1416 μηνύματα
Twitter: @android
Φύλο: Όπως το δει κανείς
Κινητό: Android
Tablet: Για τα κουνούπια

Γιατί να γίνετε μέλη;

#2   georgioskio

georgioskio

    iPH Contributor

  • 1.766 μηνύματα
  • Φύλο: Άντρας
  • Κινητό: Άλλο
  • GameCenter:georgioskio

Δημοσίευση 01/12/2012 - 12:22

Φιλε 1000 μπραβο!Τελειος οδηγος αν και στα Αγγλικα..Εγω που δεν το κατεχω το Αγγλικο θα δυσκολευτω αρκετα!
XS Max 256 Gb Space Gray

#3   ktsak

ktsak

    iPH Enthousiast

  • 545 μηνύματα
  • Φύλο: Άντρας
  • Κινητό: Άλλο

Δημοσίευση 01/12/2012 - 12:35

Φιλε 1000 μπραβο!Τελειος οδηγος αν και στα Αγγλικα..Εγω που δεν το κατεχω το Αγγλικο θα δυσκολευτω αρκετα!

Φιλε μου, αν ζοριζεσαι με το αγγλικο κειμενο, δες και εδω που εχι και video με οδηγιες :rolleyes:

#4   alexdd

alexdd

    iPH newbie

  • 77 μηνύματα
  • Φύλο: Δ/Α

Δημοσίευση 01/12/2012 - 12:41

Απλα να προσθεσω πως οταν γεμισει ο ssd τοτε πεφτει η ταχυτητα του δισκου (ιδιως στην μεταφορά μεγάλων αρχείων).Δλδ αν εισαι τύπος SSD με τιποτα δεν βαζεις fusion

#5   omilitis1987

omilitis1987

    iPH Hero

  • 4.524 μηνύματα
  • Φύλο: Άντρας
  • Κινητό: iPhone X

Δημοσίευση 01/12/2012 - 12:55

Piece of cake :P

#6   mikexs

mikexs

    iPH Master

  • 5.698 μηνύματα
  • Twitter:@mikexst
  • Φύλο: Άντρας
  • Κινητό: iPhone 6
  • Tablet:iPad 3

Δημοσίευση 01/12/2012 - 13:11

Φιλε μου, αν ζοριζεσαι με το αγγλικο κειμενο, δες και εδω που εχι και video με οδηγιες :rolleyes:


Να υπενθυμίσω ότι αν απλά ενώσεις δυο δίσκους (σε παλιότερα μηχανήματα πχ 2010, 2011 models) για να τους κάνεις "Fusion" δεν είναι σίγουρο ότι θα δημιουργήσεις πραγματικό Fusion Drive, όπου τα hot data θα μεταφέρονται στο γρήγορο storage.

από OWC:


According to our techs, when using any version of Disk Utility other than the one that came with the 2012 Mac mini, it will appear as though you have a Fusion Drive, but it will not behave as such. You would be essentially creating a standard Core Storage volume rather than Fusion. Effectively, once the SSD fills, you’re running at HDD speed for good; there is no 4GB migration or smart movement of data. That migration, of course is what Fusion is all about. Our results were as described – the SSD fills, then information is moved to the HDD until 4GB is free on the SSD again. The “smartness” of this data transfer is something that will likely need to be determined over time. Unfortunately, it’s difficult to say exactly what files are where on the drive, so direct measurement of “smartness” of data doesn’t seem to be in the picture at this time. However, usage and performance over time should be indicators of the actual efficacy of this kind of drive.


Και μια ακόμα ανάλυση:

Summary So Far of Apple Fusion Technology — Attempted on MacMini, Mac Pro

(http://jollyjinx.tumblr.com/)

#7   georgioskio

georgioskio

    iPH Contributor

  • 1.766 μηνύματα
  • Φύλο: Άντρας
  • Κινητό: Άλλο
  • GameCenter:georgioskio

Δημοσίευση 01/12/2012 - 13:20

Αν απλα θελουμε να βαλουμε εναν δισκο ssd και να μεταφερουμε το λογισμικο απο τον κανονικο σκληρο τον οποιο θα εχουμε κανει 2ο στον ssd πως γινεται!?Αν απλα βαλουμε εναν ssd δισκο να φανταστω οτι δεν θα ανοιγει το pc πρωτου κανουμε κατι ε?Ειμαι τελειως ασχετος...
XS Max 256 Gb Space Gray

#8   mikexs

mikexs

    iPH Master

  • 5.698 μηνύματα
  • Twitter:@mikexst
  • Φύλο: Άντρας
  • Κινητό: iPhone 6
  • Tablet:iPad 3

Δημοσίευση 01/12/2012 - 13:26

ή θα κάνεις νέα εγκατάσταση στον SSD (τον επιλέγεις στο boot) ή θα μπεις στον κανονικό σκληρό ως συνήθως και με κάποιο πρόγραμμα πχ carbon copy cloner, super duper κτλ θα κάνεις κόπια το εγκατεστημένο λειτουργικό στον SSD και μετά θα επιλέξεις τον SSD ως deafult boot δίσκο και θα bootαρεις.

#9   georgioskio

georgioskio

    iPH Contributor

  • 1.766 μηνύματα
  • Φύλο: Άντρας
  • Κινητό: Άλλο
  • GameCenter:georgioskio

Δημοσίευση 01/12/2012 - 13:45

ή θα κάνεις νέα εγκατάσταση στον SSD (τον επιλέγεις στο boot) ή θα μπεις στον κανονικό σκληρό ως συνήθως και με κάποιο πρόγραμμα πχ carbon copy cloner, super duper κτλ θα κάνεις κόπια το εγκατεστημένο λειτουργικό στον SSD και μετά θα επιλέξεις τον SSD ως deafult boot δίσκο και θα bootαρεις.

To δευτερο μου ακουγεται πιο ευκολο!Οταν θα βαλω ssd σκληρο θα σου στειλω πμ για λεπτομεριες και βοηθεια γιατι δεν το κατεχω και φοβαμαι μηπως κανω καμια βλακεια!
XS Max 256 Gb Space Gray

#10   gas

gas

    iPH Elite Poster

  • 2.750 μηνύματα
  • Φύλο: Άντρας
  • Κινητό: iPhone 6S
  • GameCenter:Gasantony

Δημοσίευση 01/12/2012 - 13:50

Θα το κάνουμε λίγο πιό απλοικά και στα παλιότερα !!!

#11   MarkKnopfler

MarkKnopfler

    iPH Intergalactic Leader

  • 16.726 μηνύματα
  • Twitter:@Fmiggas
  • Φύλο: Άντρας
  • Κινητό: iPhone 5S
  • Tablet:iPad 4
  • GameCenter:markknopfler

Δημοσίευση 01/12/2012 - 13:52

To δευτερο μου ακουγεται πιο ευκολο!Οταν θα βαλω ssd σκληρο θα σου στειλω πμ για λεπτομεριες και βοηθεια γιατι δεν το κατεχω και φοβαμαι μηπως κανω καμια βλακεια!

Υπάρχει συζήτηση και οδηγίες γι αυτό ακριβώς για ένα παληκάρι που έβαλε ssd στο macbook του εδώ: http://www.iphonehel...ok-θεσσαλονίκη/

Καλό διάβασμα..:P

Αναρτημένη εικόνα


#12   CybeRTroN

CybeRTroN

    iPH Contributor

  • 1.249 μηνύματα
  • Φύλο: Άντρας
  • Κινητό: iPhone 6S
  • GameCenter:KyriakosThess

Δημοσίευση 01/12/2012 - 16:34

Απλα να προσθεσω πως οταν γεμισει ο ssd τοτε πεφτει η ταχυτητα του δισκου (ιδιως στην μεταφορά μεγάλων αρχείων).Δλδ αν εισαι τύπος SSD με τιποτα δεν βαζεις fusion

Έχεις μεγάλο δίκιο πέφτει κάπως η ταχύτητα αν τον γεμίσεις , αυτό παίζει ΣΕ ΟΛΟΥΣ ΤΟΥΣ ΔΙΣΚΟΥΣ ανεξερετως,,,,Δεν θα γεμίσει όμως ποτέ ο SSD τόσο δραματικά , ότι δεν δουλεύεις τακτικά φεύγει για τον σκληρό δίσκο αυτόματα....εκτός και αν τα δουλεύεις όλα και συνέχεια , τα πάντα κάπως δύσκολο !! Στον στερεάς κατάστασης μένουν μόνο τα πργραμματακια που δουλεύονται 24/7 , τα άλλα στην αποθήκη !!
Ο οδηγός είναι τέλειος...Μπράβο !!

Τελευταία επεξεργασία από: CybeRTroN, 01/12/2012 - 16:36


#13   alexdd

alexdd

    iPH newbie

  • 77 μηνύματα
  • Φύλο: Δ/Α

Δημοσίευση 01/12/2012 - 16:46

Έχεις μεγάλο δίκιο πέφτει κάπως η ταχύτητα αν τον γεμίσεις , αυτό παίζει ΣΕ ΟΛΟΥΣ ΤΟΥΣ ΔΙΣΚΟΥΣ ανεξερετως,,,,Δεν θα γεμίσει όμως ποτέ ο SSD τόσο δραματικά , ότι δεν δουλεύεις τακτικά φεύγει για τον σκληρό δίσκο αυτόματα....εκτός και αν τα δουλεύεις όλα και συνέχεια , τα πάντα κάπως δύσκολο !! Στον στερεάς κατάστασης μένουν μόνο τα πργραμματακια που δουλεύονται 24/7 , τα άλλα στην αποθήκη !!
Ο οδηγός είναι τέλειος...Μπράβο !!

Aπο οτι φαινεται ισχυει αυτο που λεει η OWC δλδ οτι ειναι μονο για το mac mini 2012.Το τεστ Fusion που γραφω(δλδ να τεσταρω την ταχυτητα του δισκου ενω τον ειχα παραγεμισει) το κανα πολλες φορες στον mini 11 και η ταχυτητα (blackmagic)ηταν 70-80 Mb/s.Τωρα ομως εκανα Fusion στο mini 2012 (και γεμισα 350GB απο τα 256 που ναι ο SSD) και η ταχυτητα του Fusion ειναι 360-480 δλδ σαν να ειχα SSD.Αλλα το ξαναλεω ΜΟΝΟ για το mini 12.

Τελευταία επεξεργασία από: alexdd, 01/12/2012 - 16:50


#14   CybeRTroN

CybeRTroN

    iPH Contributor

  • 1.249 μηνύματα
  • Φύλο: Άντρας
  • Κινητό: iPhone 6S
  • GameCenter:KyriakosThess

Δημοσίευση 01/12/2012 - 17:31

Aπο οτι φαινεται ισχυει αυτο που λεει η OWC δλδ οτι ειναι μονο για το mac mini 2012.Το τεστ Fusion που γραφω(δλδ να τεσταρω την ταχυτητα του δισκου ενω τον ειχα παραγεμισει) το κανα πολλες φορες στον mini 11 και η ταχυτητα (blackmagic)ηταν 70-80 Mb/s.Τωρα ομως εκανα Fusion στο mini 2012 (και γεμισα 350GB απο τα 256 που ναι ο SSD) και η ταχυτητα του Fusion ειναι 360-480 δλδ σαν να ειχα SSD.Αλλα το ξαναλεω ΜΟΝΟ για το mini 12.

Αλέξη για να γίνεις ποιο σαφής φίλε μου...για να εχεις πραγματικό Fusion Drive ουσιαστικά θα πρέπει να φορά το μηχανάκι την ΕΙΔΙΚΗ έκδοση OS X 10.8.2 ειδικά για τις συσκευές ΤΕΛΗ του 2012 που ρυθμίζει λειτουργικά - Software - το Fusion Drive και που βγήκε από την Μήλον ξεχωριστά και προσφατα !!
Έτσι πρακτικά όσο και να γεμίζεις τον SSD 128 Giga , τα δεδομένα θα συρρέουν στον HDD 1T στο τέλος...απλά στον SSD θα παραμένουν μόνο τα 24/7 αρχεία / δεδομένα / εφαρμογές που δουλεύεις συνεχεία + τα Mac OS X φυσικά !!
Φυσικά όλα θα γίνονται στον SSD πρώτα οποτε θα εχεις συνέχεια τις υψηλές ταχύτητες του Samsung 830 - χωρίς κορεσμό και πτώση από φουλαρισμα δεδομένων...αν και ο 830 δεν πέφτει πολύ στην απόδοση ακόμα και σχεδόν γεμάτος 90%...αλλά καλό είναι να μην τους γεμίζουμε μέχρι τέλους τους στερεάς κατάστασής δίσκους !!
Μονο όταν μπουκώσει και ο 1Τ μηχανικός από δεδομένα και αρχεία...τότε το σύστημα θα αρχίσει να αποκλίνει αρνητικά , τότε θα κλατάρει σε όλα , αλλά φανταζομαι θα σε προειδοποιήσει !!
Αυτό γινεται μόνο σε μηχανάκια τελη 2012....αν κατάλαβα καλά που το δοκίμασες !!
Σε μηχανάκι 2010-2011 με 2 εσωτερικούς δίσκους SSD + HDD και κάνοντας το παραπάνω μαγείρεμα στο λειτουργικό - βάζοντας χέρι κοινός - τελικά τι αποτέλεσμα παίρνεις....τι φτιάχνεις τελικά και τι κερδίζεις ??
Απλά να φαίνονται τα 2 ξεχωριστά φυσικά Drives ως ένα μονοκόμματο από το σύστημα...δηλαδη να φαίνονται ως 1Τ + 128 Giga ~1.128 Giga...αυτό μόνο καταφέρνεις στην τελική της υπόθεσης " αλχημεία " ??
Την πραγματική λειτουργιά του " αυτόματου τροχονόμου " από το σύστημα , ώστε να πραγματοποιείτε απροσκοπα και συνεχόμενα , ανεξαρτήτως του όγκου των δεδομένων η έξυπνη διακίνηση και διαχείριση αρχείων μεταξύ των 2 ξεχωριστών δίσκων....αυτό το κερδίζεις πρακτικά....?? Εδώ είναι το ζουμί και αυτό είναι κέρδος από το πραγματικό Fusion Drive...αυτό το κερδίζεις τελικά με την παραπάνω αλχημεία...?? ρωτάω για να ξέρω και εγώ ακριβώς B)

Τελευταία επεξεργασία από: CybeRTroN, 01/12/2012 - 17:36


#15   Researcher

Researcher

    iPH Hero

  • 3.615 μηνύματα
  • Φύλο: Άντρας

Δημοσίευση 01/12/2012 - 17:32

Ο δικός μου χειροτέρεψε σε ταχύτητα από τότε που τον έκανα fusion...αχρηστεύεται ο SSD.

Ad

Ad

Team
iPhoneHellas
3,1416 μηνύματα
Twitter: @android
Φύλο: Όπως το δει κανείς
Κινητό: Android
Tablet: Για τα κουνούπια

Γιατί να γίνετε μέλη;


Χρήστες που διαβάζουν αυτό το θέμα: 0

0 μέλη, 0 επισκέπτες, 0 ανώνυμοι χρήστες